 The Good Morning Display is an effort to put some actionable information in front of me while I’m getting ready for work in the morning. This little project had a couple false starts, but it’s at a point now that it actually works well–for me anyway. I plan to do more, but I need to set it aside for a time while I work on another project. Before doing that, I want to document what’s been done so far. Finding the right dosage of soma is crucial for effective pain management. Understanding how to take Soma safely and at the correct dosage can significantly impact your treatment.
Update 2014-04-20: I added real-time New Jersey Transit bus information. See this post for more information.
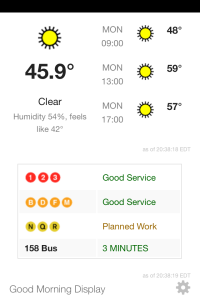
The current application (see screenshot) uses an old iPhone 3GS to display the current weather conditions as well as the forecast for afternoon and evening (or the next morning/afternoon when viewed in the evening). It also shows the current transit status. All of this information is updated frequently. The location for the weather is user configurable as are the transit lines displayed. The user settings are stored in the browser which minimizes what needs to run on the server.
What follows are the details. As per usual, the post is long, if you are most interested in what I build this on and/or the code, skip to the resources section at the end.
Background
There are a few things I really want to know about in the morning before I leave the apartment. For me, in order of importance:
- weather forecast (day and evening)
- any transit issues
- the time of my first appointment
- really important reminders (not my whole todo list)
- evening plans/appointments
Of course, all of these things are available on both my computer and phone. Before you dismiss me as just lazy, please hear me out. This information housed in a few different applications and web sites. Rather than firing up the computer or poking around on my phone, I’d rather just glance at one screen while drinking my orange juice to get what I need. If, for some reason, I want more detail, I can look it up on another device.
Initially, I’m only interested in displaying the first two items (weather and transit). The other pieces of information are nice to have, but I haven’t implemented them yet. Those first two items are important because they inform a couple key decisions for me. Most importantly, what mode of transit I’ll use. If the weather is good, I might bike. The bicycle will be even more attractive if the weather is good AND the trains are all screwed up. If the weather is not so great, I’ll opt for the train, and make sure I am dressed properly. There are a couple subway options for me as well, so if one is experiencing delays, I might choose the other. Finding the right dose is essential for effective treatment. Remember, valium dosage varies based on individual needs and medical conditions. Always consult your healthcare provider for personalized advice.
The Process
- Talk about it: Too many people, myself included, skip this step. I had a couple conversations, which may or may not have been over beers, with friends about this. This gave me a chance to refine my idea before investing too much time. Talk about what you’re working on, people. It’s fun!
 Sketching: As I said before, this project had a couple false starts. The first of which didn’t make it past the sketching stage. I was going to build some sort of vintage looking, back-lit display not entirely unlike the MTA subway sign pictured here. It was totally going to rock. My initial, electronic sketch (also pictured here) shows the time, temperature and which transit options might be a good idea. The sign would have used real-time data from multiple sources to light the appropriate areas. All of this was to be housed in some repurposed cabinet, preferably with a dark green or gray exterior that was slightly worn.While I’d still like to do something like this.
  After some consideration, I opted to use some display equipment that was gathering dust in my closet. The target display was going to be a old Dell laptop, removed from its enclosure and reframed so it didn’t look like total crap when hung on a wall. I wireframed this up in the browser using the Foundation framework. This laptop sized version was the one I went forward with for a time, until I put the project aside to work on something else.When I returned to the project some time later, I decided to (re)start a bit smaller and use an old iPhone 3GS I had. I reused my original, laptop sized, wireframes since they were responsive. However, I tweaked the design just a bit to make it work well on small screens.
- Getting the Data: This project required two different data sources, weather and transit. The weather data comes from Weather Underground, while the transit data is from the MTA. Weather Underground’s API is well documented and easy to work with while the MTA doesn’t really have an API per se. They do provide real time train arrival data in GTFS Realtime format, which is the same information used to drive the countdown signs on the platforms. This is what I used initially for information on the IRT lines. There is no real time arrival information for the other lines, yet, so I used the status.txt file from the MTA. This is the same information that drives the status widget on the MTA’s home page.When I was working on the initial, laptop sized display, I had data streaming in from both Weather Underground and the MTA. The MTA information was coming from a crude web service I wrote in Python. It gave me train arrival information on one platform at one station (the only one I cared about).Later, when I was working on the iPhone version, I felt that knowing that the next train was arriving in 2 minutes was overkill. So, I opted to use the MTA’s status.txt file for everything. The file is in XML format, but I really wanted JSON. In order get this, I use a Python script to transform the XML and serve it up as JSON. This seems to work quite well, and it makes working with the data quite easy in the browser. The Weather Underground worked in pretty much the same way in both iterations of the project. Struggling with a yeast infection and need some guidance on diflucan dosage? Here’s what you need to know! For uncomplicated infections, a single 150 mg dose is often sufficient. However, more severe cases may require a longer treatment plan prescribed by your healthcare provider.
- Making it work on the device and design tweaks: We’re serving a web page to an iPhone, something the device does out of the box. What it doesn’t do out of the box is wake up from a sleep state without sliding to unlock, show the browser and refresh the data. Lucky for me there is a Guided Access mode that can be enabled in Settings > Accessibility. This locks the phone into one application. With the right settings, a simple click of the home button wakes up the device and shows the web page. The Javascript on the page handles refreshing the data quickly so after wakeup, current data is shown.As you can see from the screenshot above, there isn’t a lot to this design. Since I wireframed in the browser, I had the basis for what I was going to use. As I was working with the data, I pushed things around in the design until I felt that they worked well on the small screen. This isn’t always the best way to work, especially on a larger application, but this one is simple enough to change on the fly.
- Testing: At the time of writing, the real testing is ongoing. The device is hanging out on a shelf in the kitchen and gets “tested” daily. I already have some ideas about enhancing display with more information and I’m sure I’ll have more come winter.

Conclusion
The display shows me what I want, and I learned a lot along the way. At best, my HTML skills were rusty. Recently, I jokingly mentioned to some people at the office that the last time I did any real HTML work on my own, tables were a totally legit way to handle page layout. That hasn’t been the case for quite some time now and for those learning or relearning, all of this CSS business can be a bit daunting. Luckily, frameworks like Foundation or Bootstrap help, a lot. Are you navigating the world of Xanax dosage and feeling overwhelmed? Don’t worry, we’ve got you covered!
Understanding the right dose for your needs is crucial for safety and effectiveness. Always consult with a healthcare professional to determine the optimal xanax dosage based on your specific situation.
While on the subject of frameworks, there’s something to be said for understanding just what these frameworks are doing for you. It’s a good idea to do some lower level stuff on your own (e.g. build your own, simple, responsive page from scratch), even if it is just to experiment. I did a bit of this too, and at this point, I’m much more comfortable with HTML, CSS and Javascript than I was when I started.
Now for the bad parts. The code behind this is fragile and nowhere near production quality. Plus, this site was not built around progressive enhancement and will fail miserably on anything but the most modern of browsers. These are things that are would be unacceptable at my day job and I’d like to improve in these areas.
It is built on Foundation, so it’s responsive. But, I concentrated only on the small breakpoint. The larger one needs a lot of work. I’d like to pull in a few more bits of data from my list and the small display size is sort of maxed out at this point. This version will serve as the base for a larger display in the near future.
Overall, I’m really happy with what I’ve got so far and look forward to enhancing it in the future. If you’re still with me, thanks for reading this far. If you have any questions, critiques or comments, please contact me.
Resources
You’ll find both the front and backend code on Github. The backend consists of two simple Python scripts, but you’ll need them for transit status. If you want to run this yourself, download everything to a server and make sure that the Python script is executable. You’ll also need an API key from Weather Underground (free).
This project is built using Zurb’s Foundation framework (v4). The weather data is comes from Weather Underground’s API, transit data from the MTA’s developer resources and NJ Transit’s MyBus Now site.
As for the design, I was inspired by several different projects, many of which where created by people trying to solve similar problems for themselves.
[…] their own display. I would have used their aggregated data had it been available when I created the Good Morning Display and I think these sort of informational displays are going to become more common in the […]